These are 1940's beauties (it says so underneath the seats!):
I bought the set with a table and a sideboard for a very reasonable price - plus, with the added bonus that funds go to the hospice and the environment benefits in my recycling I can easily convince myself that the purchase was completely and utterly necessary.....
I LoVE painted furniture - I LoVED it before it was classed as vintage cool. It's just my personal preference. So despite these being nice walnut and in relatively good condition for their age, I'm not a fan of dark wood so with a couple coats of paint and a cath kidston style seat replacement the following can be revealed in my first blog - ta da!!
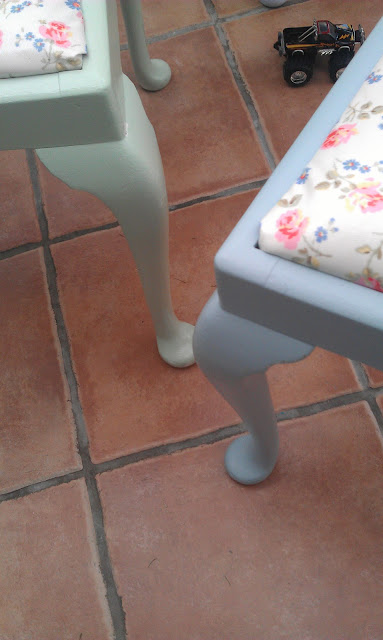
I painted each chair in eggshells of varying pastel blues and greens - they're not as differing shades as I might have liked, but I used the paint we had in the shed so can't complain!! The idea was to create a mis matched tonal upcycle (sorry about the quality of the photo below - I was interrupting some serious hot wheels play and couldn't clear the area properly!!).
I was inspired to paint them different colours from a previous Cath Kidston photoshoot in a magazine, although the red and yellow would stand out ridiculously in my house so opted for the more muted ice cream shades. Original image found here.
The old chair fabric was removed and I stapled some lovely Cath Kidston oilcloth over the seats and reinserted the newly prettified bases.
The table I painted a cream called "buttermilk" and as I didn't have enough of the same oilcloth I chose another of Cath K's pattern from my stash. The table does extend but I chose to staple the cloth to the underside as I really wanted to show off the Queen Anne style legs that are the look I soooo love. I then added a couple applications of clear wax to finish them off.
It's been complete since July and each time I pass it my heart skips a little and I do like to stroke it!! It's my visual dream of how I'd like my whole house to be - my own spot of Floral Utopia.
So, there we go - my first ta dah!!
Now I've done this I'll be sharing some more of my creative goings on. I'm addicted to granny squares now I've mastered them and am loving how portable they are - squares have been made in a number of parks, on a couple of beaches and by the side of a swimming pool so far this week. Not sure what I'll do with them, but it's fun for now!
Have a good weekend,
J9 x


Wow, I am so impressed! How did you manage to do that so quickly? It's the sanding down that's the killer isn't it? It all looks fab. I particularly like the way that you chose to use different colours for the chairs. Are you going to give the sideboard the same treatment? Or maybe you already have. What's that I see in the background?
ReplyDeleteWell done x
wow janine that is an awsome makeover. i wish i was so brave. i picked up a couple of fancy old chairs, dark wood to go with my gorgeous oak twin pedestal table and do love the shabby chic style but find it hard to paint over the nayural wood. oh i am so torn after seeing your lovely transformation. go with the grannies. im looking for the right colour to join mine. meanwhile my ripple is finished and on my blog and i have started another. yes, my blog has progressed thanks to your encouragement. blessings, trills:-)
ReplyDeletewow janine that is an awsome makeover. i wish i was so brave. i picked up a couple of fancy old chairs, dark wood to go with my gorgeous oak twin pedestal table and do love the shabby chic style but find it hard to paint over the nayural wood. oh i am so torn after seeing your lovely transformation. go with the grannies. im looking for the right colour to join mine. meanwhile my ripple is finished and on my blog and i have started another. yes, my blog has progressed thanks to your encouragement. blessings, trills:-)
ReplyDeleteYou are right - they are very similar and the chairs were a lot like yours (you can still see one at the back of the table in the after photos) although I know our set was much older and from around 1900-1910. I love what you did with the oil cloth.
ReplyDeleteI know - it's strange considering the miles between us!! I love old wooden pieces - especially for you where it was in the family previously! Thanks for popping over and taking a look! J9 x
ReplyDeleteThanks for your lovely comment on my blog about PCH, I'm so glad you enjoyed it. I have too. I absolutely adore your table and chairs, they are gorgeous and what a fabulous make-over. I would love to cover my table too, but it's round and extends, so that's never gonna happen. Well done on such a dreamy job though :)
ReplyDeleteS x